Table of Contents
- What You Need Before You Climb Into the Attic
- Step 1: Look for Water Stains and Discoloration
- Step 2: Check the Attic Insulation for Damp, Wet, or Compressed Areas
- Step 3: Recognize the Signs of Roof Leaks in Attic
- Step 4: Identify Attic Insulation Mold Symptoms
- Step 5: Tell a Roof Leak Apart from Condensation
- Step 6: Measure Moisture and Decide What to Remove
- When to Stop DIY and Hire a Professional Home Inspector for Attic Issues
- Frequently Asked Questions
Last Updated: October 17, 2026
What You Need Before You Climb Into the Attic
Spotting water damage in attic insulation starts with knowing what to bring and what to look at.
Attic insulation is the material that slows heat flow between your living space and the roof. When it gets wet, it stops working well and it usually stays wet far longer than you’d expect.
Before you climb up, gather:
- A bright flashlight or headlamp
- A dust mask rated N95 or better
- Gloves and long sleeves
Wear shoes with grip. Attic joists hide under insulation, and one wrong step means a repair bill.
Step 1: Look for Water Stains and Discoloration
Water stains and discoloration are the first clue to check, because they last long after a leak dries. Scan the wood with your flashlight, working from the hatch outward in slow, even sweeps. Look at the rafters, the roof sheathing, and the ceiling below.
Yellowish and Brown Marks on Wood and Ceilings
Yellowish marks usually mean an old, dried leak. Brown or dark rings often point to active moisture. Fresh water marks look darker and feel cool or damp to the touch.
Check these spots first:
- The underside of the roof deck
- Rafter edges and the ridge beam
- Around the chimney
- Above the attic hatch
Take photos of every mark. A photo record helps when you hire a professional home inspector for attic issues, and it shows a seller what needs fixing before a listing.
Step 2: Check the Attic Insulation for Damp, Wet, or Compressed Areas
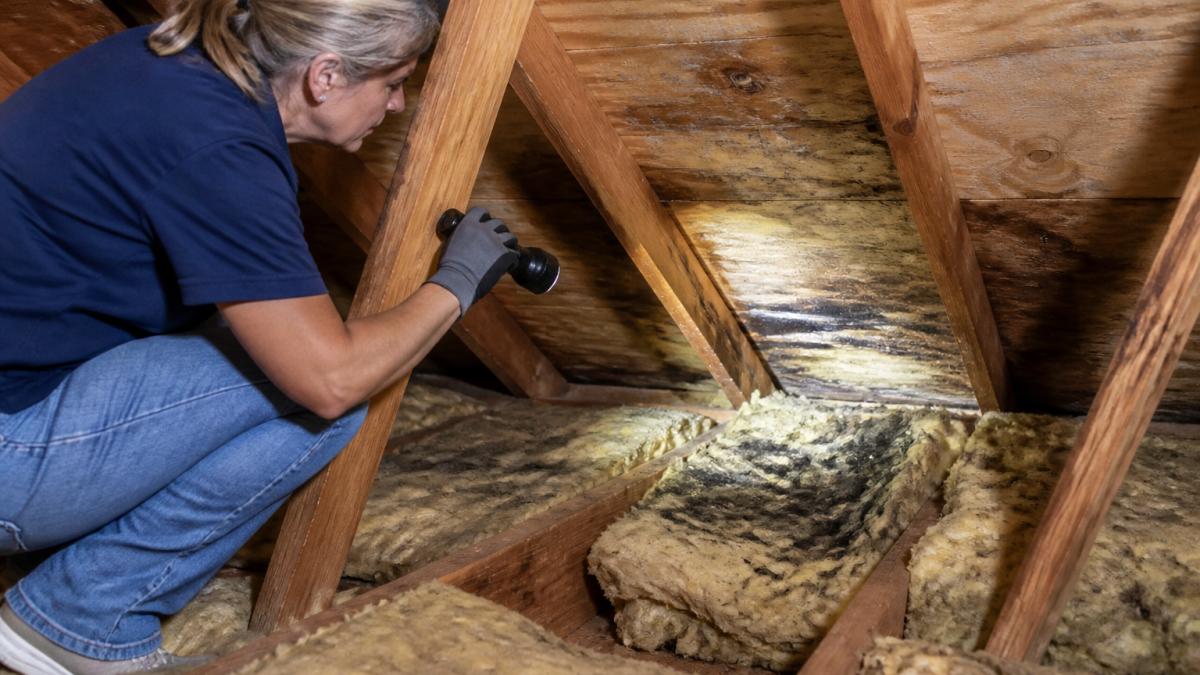
Damp insulation is the clearest sign of water intrusion, and it is easy to miss from the hatch. Step onto your board and look at the insulation surface first, then feel a few spots with a gloved hand.
Fiberglass Batts
Fiberglass batts are the most common attic insulation and the easiest to inspect, but also the easiest to misread. Dry fiberglass is fluffy and springs back when you press it.
A critical point: fiberglass itself does not absorb much water, but its binder and the paper or foil facing can trap moisture against the wood.
Compression is a separate problem.
Loose-Fill Fiberglass
Loose-fill fiberglass is blown in and looks like a uniform blanket of fluffy gray or pink material. When wet, it clumps into denser piles, forms crusty patches, or shows uneven settling.
Use a gloved hand or a stick to probe several spots, especially near roof penetrations, under vents, and along the eaves. If the material feels heavy, packed, or cold, it is holding moisture.
Cellulose
Cellulose is treated paper fiber and is the most moisture-sensitive common insulation. It absorbs water readily, packs down, and darkens to a deep gray or brown. Wet cellulose rarely dries in place in a closed attic, and it can support mold growth within the material itself. If cellulose is wet, clumped, or dark, remove it, do not try to dry it in place.
Spray Foam
Spray foam is the exception. Closed-cell foam is largely impermeable and resists water absorption, but it can trap moisture against the roof deck if the foam itself is compromised. Open-cell foam is softer and can absorb water. Look for soft spots, bubbling, discoloration, or areas where the foam has pulled away from the wood. Do not cut or remove spray foam yourself, it is a job for a professional, and cutting it can release trapped moisture and damage the roof assembly.
What Compression Alone Tells You
Compressed insulation is another warning. When batts are squashed flat, they lose their air pockets and stop insulating. If the material sits lower than the joists around it, water or poor installation is likely the cause. In either case, the fix is the same: find the moisture source, dry the framing, and replace the compressed material.
Never press bare hands into insulation or step on it to test for moisture. Fiberglass irritates skin, and soft, wet spots can hide a hole in the ceiling below. Use gloves and a board. If the insulation is moldy or heavily contaminated, wear an N95 respirator and eye protection, and consider leaving removal to a professional.
Step 3: Recognize the Signs of Roof Leaks in Attic
The signs of roof leaks in attic are usually a trail, not a single spot. Water enters high and travels low, so the stain you see may sit far from the actual break. Follow the wood, not the drip.
Look for these clues:
- Rusty or dark roof nails
- Stained rafters that run in a line
- Drip marks on the insulation below a joint
- Wet spots after heavy rain only
Dark Spots Around Nails and Roof Penetrations
Dark spots around nails and roof penetrations are a classic leak signal. Roof nails poke through the sheathing, and each one is a small path for water. When shingles fail above a nail, rust and dark staining appear on the wood around it.
Check every penetration:
- Nail lines across the roof deck
- Vent pipes and boots
- The chimney flashing
- Skylight frames
If a cluster of nails shows dark rings, note the location. That cluster tells a roofer exactly where to look on the roof surface.
Schedule an Inspection or Request a Proposal →
Shine your flashlight at a low angle across the wood. Flat light hides stains, but side light makes every ripple and water mark stand out.
Step 4: Identify Attic Insulation Mold Symptoms
Attic insulation mold symptoms show up as fuzzy patches, dark speckling, or a musty smell that hits you at the hatch.
Watch for:
- White, black, or green fuzzy growth on joists
- Dark speckling on the insulation surface
- A musty smell that lingers
- Staining that spreads in a circle
Mold on wood framing is common after a slow leak. Mold inside the insulation itself is a bigger deal, because the material holds moisture and feeds growth.
The EPA guide to mold cleanup recommends fixing the water source first. Cleanup without a fix just brings the mold back.
Step 5: Tell a Roof Leak Apart from Condensation
A roof leak and condensation can leave the same stain, but they need different fixes. Warm, moist air rising from the house hits a cold roof deck and condenses.
Use this test:
- Timing: Leaks show up during or right after heavy rain. Condensation builds in cold weather, especially on clear nights.
- Location: Leaks trace to a roof feature. Condensation shows up across a wide area, often near the ridge or on the north side.
- Pattern: Leaks leave a line or trail. Condensation leaves even frost or dampness.
- Smell: Condensation often comes with a musty smell and high humidity in the attic.
If the attic feels humid and the stains are broad, suspect condensation. The fix is ventilation and air sealing, not roofing. If the stain sits under a vent boot or flashing, suspect a leak.
Step 6: Measure Moisture and Decide What to Remove
A moisture meter turns a guess into a number, and that number tells you what to remove. But the reading is only useful if you know where to take it, what the number means, and when to confirm it with a visual check. This section covers the tools, the thresholds, and the drying-versus-removal decision that most guides skip.
Using a Moisture Meter
A pin-type moisture meter is the most common tool for attic inspections. Press the pins firmly into the wood, not the insulation, near a stain or suspect area.
Pinless meters can scan a broader area without leaving holes, but they are affected by surface texture and density, so treat them as a screening tool. Infrared cameras are even better for finding cool, wet spots behind dry surfaces, but they only show temperature differences, not moisture itself.
Drying Versus Removal
The decision depends on the material and the extent of wetting:
- Wet fiberglass batts: remove and replace. They lose shape and never fully recover, and the facing can trap moisture against wood.
- Wet cellulose: remove. It clumps, holds water, and rarely dries in place.
- Loose-fill fiberglass: rake out wet clumps and replace; dry material can be left if it is not matted.
- Damp wood, no rot: dry it with airflow, then recheck in a week. A fan and open ventilation can dry framing if the moisture source is stopped.
Before you install any replacement insulation, fix the moisture source. New insulation over an active leak will simply get wet again. If the source is condensation, address ventilation and air sealing first; if it is a roof leak, repair the roof before restoring insulation.
OSHA guidance on attic and confined space hazards is worth a read before you spend long periods in a hot, tight attic. Heat and poor air are real risks.
Measure before you remove. A moisture reading saves you from tearing out dry insulation, and it proves the scope of damage to a buyer, seller, or insurer. Confirm every reading with a visual check, and always fix the water source before replacing insulation.
When to Stop DIY and Hire a Professional Home Inspector for Attic Issues
Stop and call a professional when the damage is wide, the wood is soft, or you cannot find the source. Hiring a professional home inspector for attic issues makes sense in four cases:
- Stains cover more than a small patch
- Wood feels soft or crumbles
- You smell mold throughout the attic
- You cannot trace the leak to a roof feature
An inspector with thermal imaging can see temperature differences that a flashlight misses. Cool, wet spots show up as dark patches on the camera, even behind dry surfaces.
At Full Disclosure Property Inspection, our infrared thermal imaging comes included with fee-paid inspections, and our Certified Master Inspector brings more than 5,000 inspections and a general contracting background to every attic.
Do not guess at a stain. InterNACHI standards of practice for home inspections spell out what a proper inspection covers, and a professional report protects your investment.
Frequently Asked Questions
How can I tell if my attic insulation has water damage?
Look for insulation that is damp to the touch, matted, compressed, or darker than surrounding areas. Water stains on nearby wood, a musty smell, and visible mold are other clues. Use a flashlight and a moisture meter to check insulation and framing. Pay attention to areas under roof penetrations and near the attic perimeter. If you find wet insulation, trace the source before replacing it, because new insulation will absorb water again if the leak is not fixed.
Does wet insulation need to be replaced immediately?
Wet insulation loses most of its insulating value and can breed mold within 24 to 48 hours. Remove and discard saturated fiberglass or cellulose rather than trying to dry it in place. Open the attic to airflow and run fans or a dehumidifier to dry the framing. Replace the insulation only after the leak is repaired and the wood is dry. Delaying replacement leaves the attic vulnerable to condensation and higher energy bills.
Can mold grow in attic insulation due to water damage?
Yes. Mold needs moisture, organic dust, and still air, and wet insulation supplies all three. Cellulose is especially prone because it is paper-based, while fiberglass can still grow mold on accumulated dust. Signs include a musty smell, dark speckling on insulation or framing, and visible fuzz. Small surface mold on framing can be cleaned, but saturated insulation should be removed. A professional inspection confirms the extent and whether the leak source is still active.
What are the early warning signs of a roof leak in the attic?
Early signs include dark spots around roof nails, water stains on rafters or sheathing, damp or compressed insulation, and a musty odor after heavy rain. You may also see rusted nail heads, peeling paint on the ceiling below, or daylight through the roof boards. Check the attic during or right after a storm, when moisture is easiest to trace. Catching these signs early limits structural damage and keeps repairs smaller.
Water damage in an attic rarely stays in the attic. It spreads into ceilings, walls, and framing, and the repair bill grows with every month it sits. If you have spotted stains, damp insulation, or a musty smell, get an independent answer before you close or list. Full Disclosure Property Inspection offers thermal imaging, detailed reports, and an opinion protected by a strict Code of Ethics. Schedule an inspection with us and know exactly what you are buying.


